Must-Follow Product Photography Tips From Our Expert

Sellers are always looking for new and different ways to increase Amazon sales, but the answer is right under their nose. Improving Amazon product photography not only attracts more traffic to your pages but also gives your shoppers a more detailed understanding of the product, which can, in turn, increase sales on Amazon. 

The problem is that photography uses a different skill set than retail, so many sellers simply don’t know how to take a good product picture. To help you get started, below we share 7 tips on how to optimize your Amazon product photography to increase FBA sales or Amazon sales in general.

                                            Read More: 7 Creative Amazon Product Photography Ideas To Stand Out

1. Show Different Sides of the Product

One of the inherent problems with eCommerce is that shoppers cannot pick up or interact with the product — they rely on product photography to judge the item’s shape, weight, and moveability. So to give shoppers the fullest understanding of what they’re buying, show the product from different angles, in different forms, inside and outside the product packaging. 

It helps to shoot multiple angles of the product against a white background, just like the one required for your main image. Be sure to include a shot of everything unpacked from the container so your customers see what they’re getting, but also include a shot of the package before it’s opened. If your product has moving parts or accessories, show them in use, too. 

2. Use Creative Camera Angles

Aside from the main image requirements, you’re free to include additional, more creative product photography ideas. These can be instrumental in increasing Amazon sales if you know what kinds of photography shoppers want to see. 

  • Infographics outlining features — You’re free to add text to some of your photos, so try pointing out certain features or hard-to-see parts, so shoppers know they’re there. 
  • Products in use — Show actual people using your products so the customer can imagine what it’d be like to own it themselves. You can also use this style to demonstrate certain features that aren’t obvious. 
  • Secondary objects — Include another object in the photo as a frame of reference for size and to be suggestive. For example, include an actual strawberry next to a strawberry-flavored product. 
  • Show movement — If your product has moving parts, try taking multiple pictures of the parts in different positions so shoppers know its flexibility. 

You also should strongly consider Amazon product videos. Product videos are known to boost sales because they show off the product better than still photos. Customers can see how people use the product, and you can even demonstrate certain features that photos still can’t convey.

Read More: 20 Stats to Drive Your Amazon Video Marketing Strategy

3. Minimize Empty Space

A common piece of advice expert photographers give to beginners is to “fill the frame,” which essentially means minimizing the amount of empty space in the background. Your product should be the main focus of attention, so make sure it takes up the majority of your shot. Try to get the camera close enough to the product that the background is hardly noticeable. 

In fact, one of the Amazon product photography requirements states that, for the main image, the product must take up 85% of the frame. Aside from the main image, you’re free to play more with perspective, but minimizing empty space is a good photography tip in general. 

4. Follow the Amazon Product Photography Guidelines

Even more important than attracting shoppers is following Amazon’s product image requirements. There are some particular rules you don’t want to accidentally break, and by learning the requirements, you can better understand what kind of pictures you can and cannot use.

Specifically, here are some key takeaways:

  • 1000-pixel minimum on either width or height
  • use either color mode sRGB or CMYK 
  • the format must be either JPEG, PNG, GIF, or TIFF
  • use a true white background (RGB: 255, 255, 255) for the main image
  • do not use additional text, graphics, or inset images for the main image

As you can see, taking product photography with a white background is necessary for at least one of your photos. However, you can make the most out of the white background by shooting multiple angles, as we advised in step 1. 

Read More: How to Hire the Best Amazon Product Photographer

5. Learn How to Retouch Photos

Even the best product photographers still use photo editing software to touch up their photos. Retouching product photos is the norm on Amazon and most other eCommerce sites, so if you want your pictures to compete you’ll have to learn some of the basics. 

The good news is that you don’t need to drop hundreds of dollars on Photoshop. You can find cheap or even free photo editing software online. This can help with aspects like brightening the colors, removing dust or other blemishes, and allowing you to superimpose text or overlap images. 

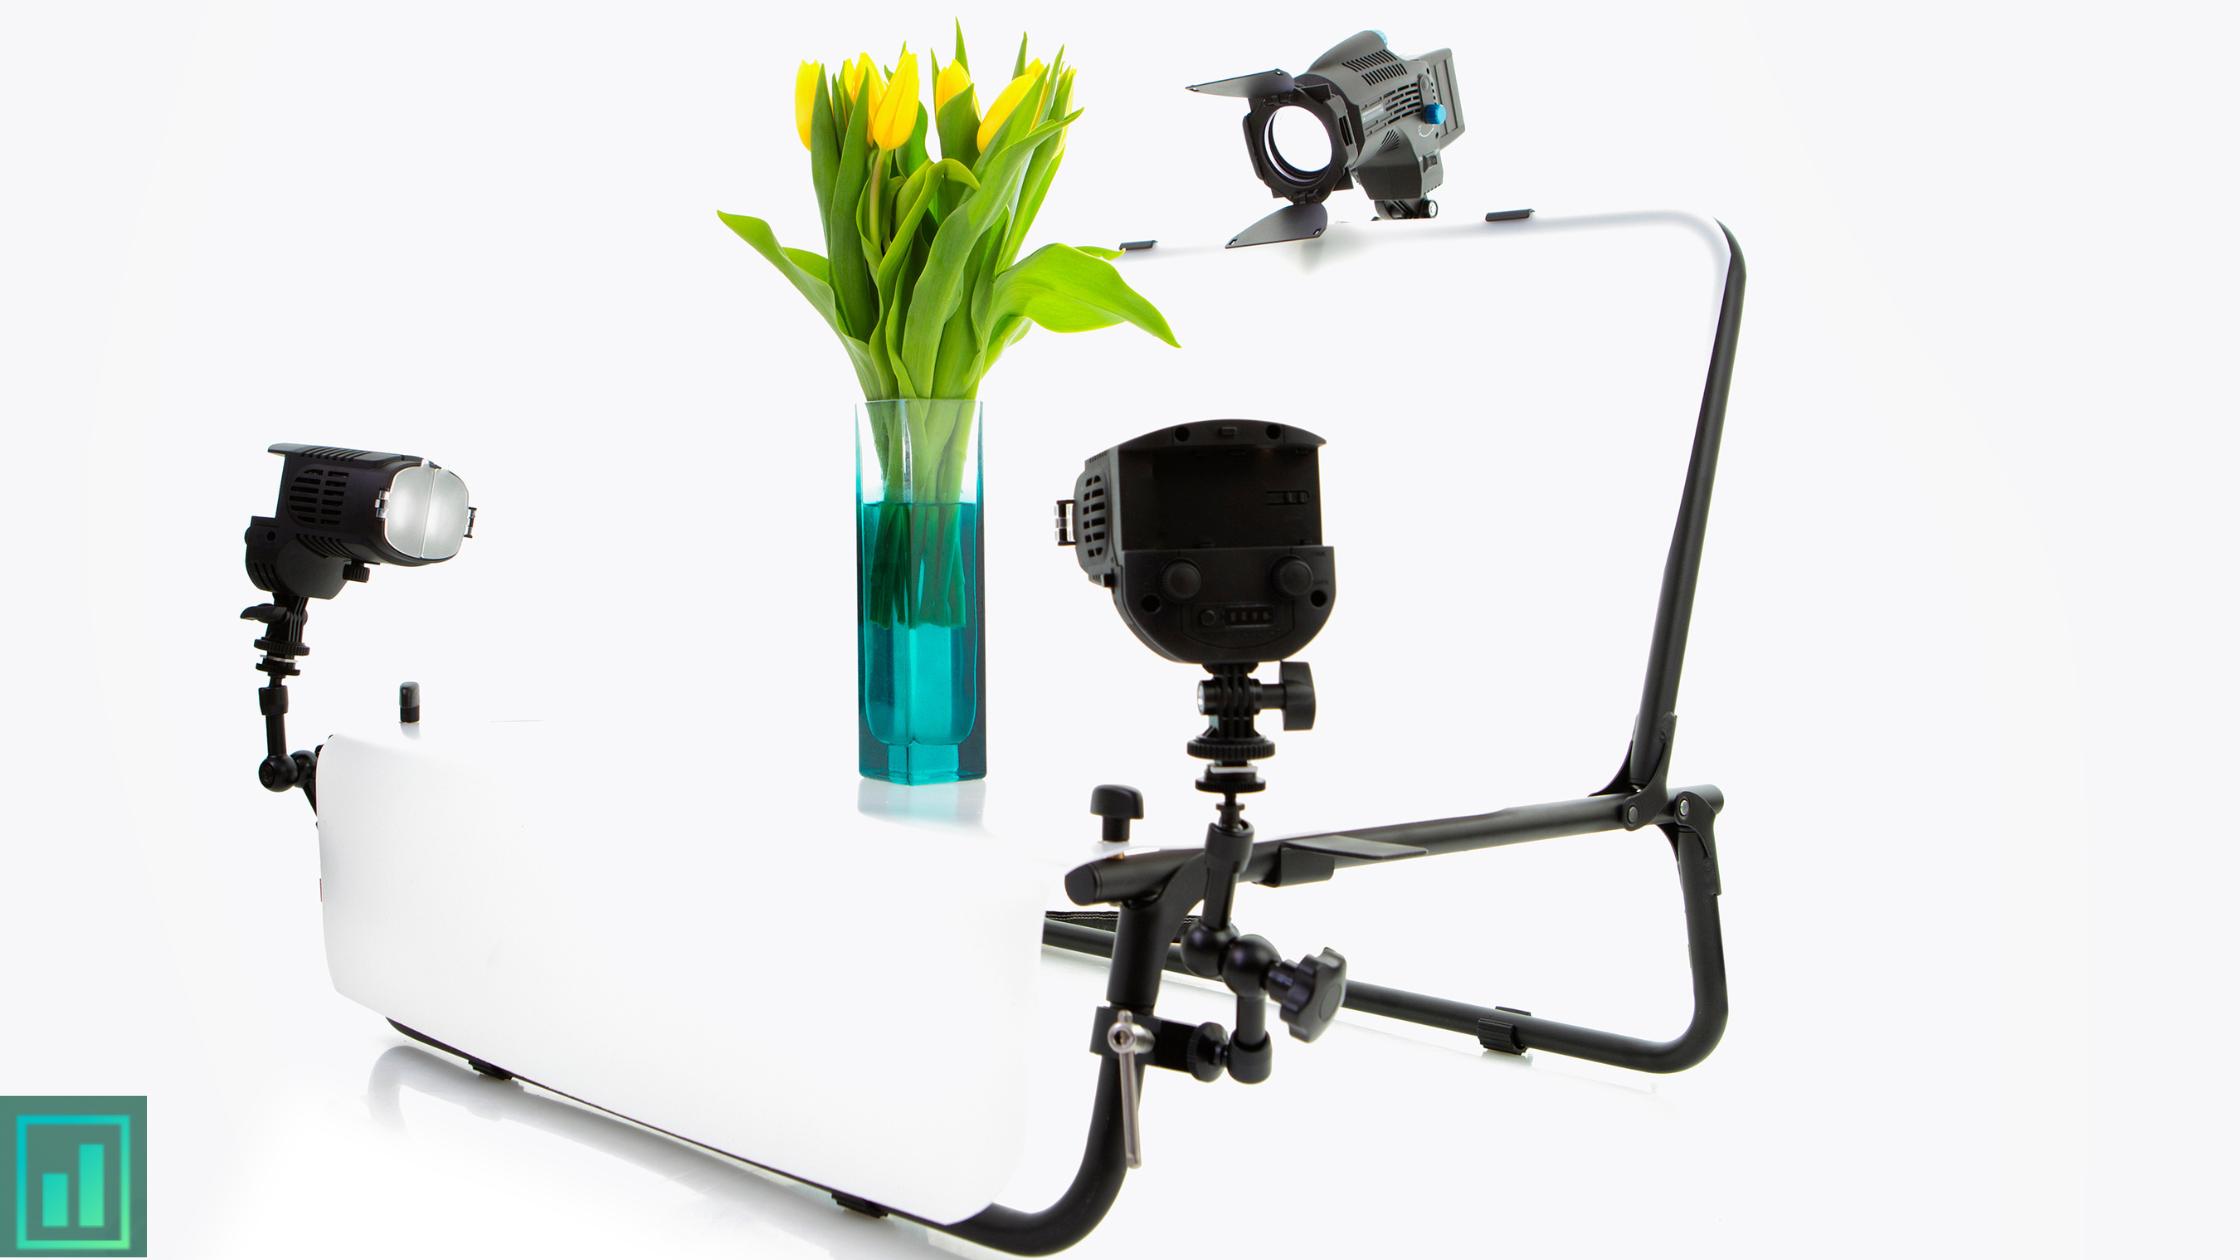
6. Use Proper Equipment

While you can technically take product photos on your smartphone, you’ll get the best results with proper photography equipment, including both a camera and lighting. To maximize results, you’ll also want accessories like a tripod and an adequate white background. 

The best cameras for Amazon product photography are usually mirrorless or DSLR. As for artificial lighting, try LED or incandescent lamps. However, be aware that these aren’t always cheap. If you want to keep your budget down, consider working with someone who already owns these things, which brings us to our final tip…

Read More: Amazon Product Photography Tips To Adopt In 2022

7. Work with Amazon Product Photography Services

While these tips are designed to improve the work of an amateur photographer, you can’t master the art of product photography in a few weeks or months. If you want truly mesmerizing pictures, you may want to hire Amazon product photography services

If you’re worried about money, hiring a professional Amazon photographer means you don’t have to buy any new equipment. In this sense, you’re coming out ahead in the cost ratio because you can leverage professional-tier equipment without actually having to buy it. 

But more important is the skill of professional photographers, who have spent their lives honing their craft and can understand concepts like angles, lighting, and how to use a camera. A professional photographer will know the right settings and angles by heart, and if you work with an Amazon service, they’ll also be familiar with the image requirements. If you’re interested and want to hear a quote, schedule a free consultation call now, up to 60 minutes. We’ll answer all your questions and explain how we can help!

7 Creative Amazon Product Photography Ideas To Stand Out

Even with the best products at the best prices, shoppers will still pass you by unless you have eye-catching photos. Mesmerizing Amazon product photography is the best strategy to increase Amazon sales, but for most sellers with backgrounds in retail, photography is not a skill that comes naturally. 

We’ve already explained the basics as they apply to amateur photographers with our DIY guide to Amazon Product Photography, but sometimes the basics aren’t enough. So in this guide, we share 7 expert ideas on creative Amazon product photography styles that you can use to stand out. These ideas aren’t your average run-of-the-mill product photos, so their unique imagery is sure to get your products noticed and increase sales on Amazon.

                                            Read More: How to Hire the Best Amazon Product Photographer

1. Blurry Outdoor Background

Blurry Outdoor Background

Source

Amazon product photography on a white background is a requirement for your main image, but your other images have more leeway. In addition to doing a standard product-in-use photo or infographic, you can also showcase your product against a blurry outdoor background. 

These photos work because they help the shopper imagine what it’s like to use the product without the risk of distracting them with background images. It’s also easy to shoot: just set your camera to a wide aperture (a low F-stop number). You don’t even need to worry too much about where the background is because the shopper won’t see much of it.

                              Read More: The Last Guide To Amazon Product Photography You Will Ever Need!

2. Floating over White Background

Floating over White Background

Source


If you want some homemade special effects, you can shoot your product against a white background so that it looks like it’s floating. This not only satisfies Amazon’s main image requirements for white backgrounds, but it also creates an interesting effect that your customers are more likely to remember. 

There are essentially two approaches to get this effect: 

  • suspend your product with a fishing line or use invisible adhesive to keep it upright in front of a white background
  • take a normal picture against a white background and edit out the floor with photo editing software like Photoshop

Regardless of which approach you choose, consider keeping in the floor shadow to leave some realism for the shopper. 

3. Infographic with Labeled Parts

Infographic with Labeled Parts

Source

Infographic images are great for when you want to both show and tell. Some products require a little explanation about how they’re used, and infographic images are more likely to be seen than the instructional text in the product description. 

But instead of listing the features of your product, try labeling each part to explain what it does. For one thing, this is another excuse to show a detailed close-up of your product. More importantly, it gives you the opportunity to explain all the beneficial parts of your products, such as interesting features the shopper may not have noticed from your other pictures. 

This type of Amazon product photography works twice as well with control panels and interfaces where the buttons are not self-evident.

                              Read More: DIY Guide to Amazon Product Photography: 7 Need-to-Know Tips

4. Visual Effects To Show Movement

Visual Effects to Show Movement

Source

Moving parts can be a huge advantage to some products, especially if competing products aren’t as flexible. But how can you show movement in a still photo? 

Using basic photography or photo-editing techniques, you can depict movement in still photos by either of these two methods: 

  • Set a low shutter speed on your camera to create a motion blur in the actual photo. (This can be difficult without photography experience, as you risk blurring the parts of the photo you actually want the shopper to see.)
  • Take a sequence of photos with the moving parts in different positions. Then, in photo-editing software, overlay all the photos on top of each other, with some transparency (as in the example). This shows the shopper the range of motion your product has. 

These techniques can get a little advanced, especially if you don’t have much experience in either photography or photo editing. If you don’t feel confident in your photography abilities, you can always use Amazon product photography services. Here’s how to hire the best Amazon product photographer

                                      Read More: Amazon Product Photography Tips To Adopt In 2022

5. Glass Floor

Glass Floor

Source

Although this Amazon product photography idea won’t work with all products, for some, it’s the perfect way to show off some hard-to-notice features. If your product has an interesting bottom, such as shoes with special treads or an appliance with gripped feet, you can display them with a glass floor angle. 

The easiest way to do it is to place the product on its side and shoot from an angle that looks like it’s underneath. If that’s not possible, you can also set the product on top of a pane of glass and take the picture from below. This gives shoppers a view of the product they would never see otherwise and can verify the safety or sturdiness of certain products. 

6. Testimonial Cards


Testimonial Cards

Source

Just like our idea for infographics with labeled parts, you can use your images to communicate certain benefits that the shopper might not bother reading in your product description text. In this case, you could use the product images to feature any famous brands or publicity your product received. 

While this Amazon product photography is not exactly about the product, you can still use the image to feature a brand logo or testimonial quote of a famous or noteworthy supporter of your product. Shoppers respond to social proof, so if they see another famous brand logo in your images and read that they endorse you, that’s a big step to make a purchase or even increase FBA sales.

                                             Read More: Amazon Product Photography Tips You Should Know

7. Silhouettes of People

Silhouettes of People
Source

Brick-and-mortar stores use mannequins because the shopper can imagine themselves wearing the clothes. That same principle can be applied to Amazon product photography by using nondescript silhouettes of people. 

Keeping the person in the photo vague — such as an outline, shadow, or cartoon — has two main advantages. First, like the traditional mannequins, an ambiguous person in the photo makes it easier for the shopper to imagine themselves in action, as opposed to a more intricate model. Second, using silhouettes minimizes the details that aren’t related to the product, so the shopper can focus more on what you’re selling and less on who’s in the picture. 


Tips For Taking Your Product Photography On A White Background

The best way to make your products look great and create a sense of value is through high-quality visual presentation. This includes having professional photos that show off every detail, but it can be hard for small store owners without access or funds like this option since they need the proper tools in order to do so themselves. Here we will learn the tips for taking product photography with white background.

When you need a spot to highlight your company or product, adding white background photography can make all the difference. It helps to highlight the essential features of the product, which will eventually help grab the attention of the viewers out there.

You can turn a mediocre product photo into something that will make people want to buy your products with just one click. All you need are some white walls and an idea of what it is they’re selling.

Read More:- Amazon Product Photography Tips To Adopt In 2022

Here are some tips to help you capture photos on a white background:

Required Peripherals

It will not be possible for you to turn a product, idea, or anything into something noticeable without having the right peripherals. Make sure you have these peripherals before you start another photoshoot

Camera

It really matters that the photographer understands the requirements of the photoshoot. It really depends upon the requirements about the type of camera to be used. Full-frame DSLR cameras are too big to lug around and set up. You can start with whatever you’ve got handy, experiment on a new camera over time until the style speaks for itself without investing in an expensive system right away!

However, if you have decided to invest in basic DSLR cameras, you can start from Nikon D3500 or Fujifilm X-T200. It will help you in grasping the ideas of photography in the beginning.

Tripod

Mounting your camera to a tripod is an essential step in the photography process. Once you have it secured, there are some things that will remain fixed and keep everything else from moving around while capturing images of varying modes like high dynamic range imaging or focus stacking which require several shots taken at different points on whatever subject matter interests you most today.

White Bounce Cards

Window light has a bright side where the sun hits it, and shadows on either side. To make things more interesting for product photography, make use of white bounce cards ( made out of foam boards ) that put an extra bit of illumination into those dark areas so they can be relieved in their product shots. It is an excellent choice because it’s rigid and can also be easily cleaned if needed.

Read More:-  FBA Product Photography: How To Make Your Main Listing Image Stand Out

Table

A smooth surface is required for your product to stay stable throughout the photoshoot. Consider getting a table with one that is wide but also long enough. The ideal size would be somewhere between 24 and 27 inches in width so it’s not too small nor too big for your needs!`

Ideal Room

The perfect room for product photography is a window that’s next to a wall. The larger the better as you’ll get more light from strong naturalistic shadows, and being closer will create softer overall tones with darker backgrounds while farther away will result in an even brighter illumination where the shadows are sharper yet lighter in detail.

Capturing Professional Photos On A White Background

When it comes to selling your products, more than 90% of consumers say that visual appearance is an important factor in buying decisions. Let’s into some professional tips you should follow to capture your next masterpiece:

Setting up the Table

Now that you gathered all the required materials, it’s time to shoot! The first thing you need to do is place the table close to the window without intersecting any shadows from these windowsills. Next, make sure that your setup goes right or left of this window at 90 degrees angle, depending on which direction light will be hitting the subject.

With natural light, the best way to get a different mood is by rotating your window. You can try putting it at an angle of 45 degrees or even straight onto the set with no obstruction for that clean and fresh feel!

Read More:- How to Increase Amazon Conversion Rates: 7 Essential Tips for 2022

Adjusting the Camera

Every camera is a little different. For some, the default setting will work just fine, and they don’t need to adjust any settings on their own. However, if you’re looking for more control over what gets captured or want an idea of how your photos are coming out then the following tweaks to your setting might help out:

  • Set your white balance (WB) to Automatic. This will allow you more control of colors and lighting for a better end result.
  • Turn Off your flash setting. This will stop any potential glare on the camera lens and ensure that you get intense exposure to whatever is in front.
  • Raw files are the largest a camera can shoot, and when edited in software such as Photoshop or Aperture will give you maximum image quality. If your point-and-shoot has this setting, use it!
  • You can set your ISO to 100 which will result in less noise. The higher the numbers are, the more sensitive they become and thus pick up on any light that might be present

Setting up the Product

There are many little details that can trip you up when setting your product. One of the most important is making sure to center yourself in front of all reflective surfaces, such as bottles with labels on them and mirrors above head height.

This can be difficult because there are often many tiny movements needed for each element, but it will go much smoother if done correctly from day one.

If your product positioning is perfect then you can try using white cards as a light modifier too. You will be blown away by the way this simple white card lights up your product. The light bounces off of it and fills in all shadows, so experiment with different angles for maximum effect.

Read More:-  3D Rendering vs Product Photography & Which One Is A Better Option For Amazon Sellers?

Capturing and Evaluating the Photo

A picture is worth a thousand words, but it’s even more than just that. Once you take the photo and look at what has been created with your camera; this will allow for the experience of both education in which skills can be improved through experimentation on various ways to make an image better over time.

After conducting several trials and errors, you might have finalized some of the photos for your product. For a better idea of how your images look, upload them onto the computer. The back of the camera sometimes misses details that are important for photography and can give unclear pictures, so I suggest using Adobe Lightroom, which provides many editing options to help fix this problem.

Read More:-  8 Mistakes Every Photographer Makes While Clicking Products For Amazon

Conclusion

Taking product photos on a white background can help you create more professional images for your products. Whether it is in an advertisement, website, or social media post, putting the product on a white background will make them stand out and appear clean

If you are looking forward to seeking professional Product photography for amazon, social media, or E-Commerce stores, contact Amz One Step today as they provide one of the most professional services in the marketplace.

Amazon Product Photography Tips You Should Know

amazon product photography

Amazon Product Photography is the initial step that the sellers need to know about. If you look at the best-selling products on Amazon, there would be a similarity in every product, the Product Photos.
When you’re selling a product on Amazon, the quality of your product photography is critical. A good photo can make customers want to buy your product, while a bad image can turn them away. Here are some tips for taking great product photos that will help your sales  and make your products look awesome:

Technical requirements For Amazon Product Photography:

  • Colour: Use RGB color space.
  • Image formats: JPEG, PNG, TIFF, GIF.
  • Pixel dimensions should be at least 1000 or larger in width or height.
  • The filenames of images should not have dashes, spaces, or additional characters, or they may be prevented from uploading online on the Amazon marketplace.
  • The image file name must have a Product Identifier followed by a period and the appropriate file extension.
  • Try using 85% of the frame to get the perfect shot.

Amazon Product Photography Tips 1: The main image:

The spotlight is on the main image since the customers spend more time looking at the main image. The customer gets the basic idea of the product by looking at the main image. So, the image must be free of any other distractions. This is why the images on e-commerce portals have a completely white background. Amazon strictly follows specific requirements for the main image.

Read More:- Amazon Product Photography Tips To Adopt In 2022

Amazon Product Photography Tips 2: The detailing:

You can add details to the product images that you take, not by using photoshop but by highlighting the characteristics of your product on the Product image. The material used and the quality of the material, the application of the product, etc., can be inserted into the product images.

Amazon Product Photography Tips 3: Experiment with your product:

The main image must meet the requirements listed by Amazon. Amazon lets you add up to 8 product images per product. Focus on how to make the rest of the 7 images more vibrant. Try using these Amazon Product Photography Strategies to add value to your product.

Highlight the benefits of the products: Use at least one image that tells the benefit of the product. This gives the customer a clear idea of the product.

Product in Action images: Amazon Sellers must know about this strategy. This adds some value to your product. Tell the customer how many ways the product can be used.

Read More:- Amazon Product Photography: The Basics

Conclusion:

Amazon product photography can be the difference between a sale and a no sale. By paying attention to the technical requirements and following some simple tips, you can take your product photos to make your products stand out on Amazon. Tell the customer how your product stands out from the competitors. Add an image stating the features of your competitor’s product and the product that you sell.

Suppose you’re looking for help with Amazon product photography. In that case, our team of experts is here to offer professional Amazon Product Photography services if you don’t want to take on the task yourself or need help getting started. Contact us today to learn more about our services and how we can help you create stunning product photos that drive sales.