If you have been trying to find success in Amazon without having an idea about the way Amazon delivers its search results; you have been taking it all wrong.
And if you think reaching the number #1 ranking will take a day or a week, you should come out of your fool paradise.
With over 5 million sellers, Amazon is indeed a very complex market where the amount of competition has increased drastically over the last 10 years. However, it highly depends upon your area of selling, product niche, and your target market.
Therefore; let’s be realistic!
Reaching the number #1 ranking in Amazon is what we all look for. Why? Because this is the only way we can have more exposure and sales.
For that, you need to understand the Amazon Ranking Algorithm and the factors it depends upon. Known as the A9 Algorithm, it determines the ranking of a specific product based on many factors including reviews, CPC, content placement, keywords usage, and Photography.
Believe it or not, Amazon is the place where the future of eCommerce stands.
Here are 5 sections of this blog:
Say Hello to the A9 Amazon Ranking Algorithm
Before I add any explanation on the search results of Amazon or how the A9 Algorithm works, let’s check out what Amazon has to say about it.

Basically, Amazon studies the search patterns of the customers for over some time. Then it matches with the relevant product. But, how will it determine the relevancy of an item against a search?
It should be noted that relevance is different for Google and Amazon.
- For Google, the relevant search is the one that has an accurate answer. Right?
- For Amazon, the relevant product is the one that is most likely to be bought by customers.
Moreover, there had been a few confusions between the Amazon Sellers and SEO Experts.
To some SEOs, Amazon only works through conversion! This is so wrong!
Google SEO is pretty different from Amazon SEO. In Amazon, you don’t need backlinks, social media clicks, or even DA to get ranked. Because Amazon works differently.
To understand it fully, let’s find out the main goal of Amazon
- Amazon always tends to maximize the ROC (Revenue per customer)
Your answer to Amazon Ranking lies in this point.
Let’ say, if a certain query gets you a sale, Amazon will most likely show you on the top the next time user searched the same query. Because this is where Amazon realizes that your product is the most relevant against that particular search.
Secondly, the ranking also depends highly upon the usage of keywords.
Keywords are more than essential; you just can’t miss them.
As In Google SEO, keywords are one of the most eminent aspects of the A9 Amazon Ranking Algorithm. Along with the relevancy, Amazon search works through analyzing the keywords placement in each listings.
Keywords can be a game-changer for any brand. The traffic on your listings is directly proportional to the numbers of keywords you have targeted.
If someone has ever told you that you can move along in Amazon without worrying about the keywords, he has simply fooled you. Why, because he himself doesn’t know the A9 Algorithm.
Some users type the product name directly on the search box, while the rest (which are in majority) type the long-tail keywords as they are looking for ideas.
For your brand to get clicks and sales on the long-tail keywords, you need a perfect keyword placement strategy for Amazon.
But, it’s quite easy for Amazon.
You will need to have a third party keyword tool to find the high-density keywords against a specified product.
As far as Keyword tool is concerned, you can find plenty of them on the web with fine features and on different pricing.
[We do have a keyword tool with the name “Amz WordSpy” that is free for the first 30 days and is made primarily to help Amazon Sellers in getting the right keywords.]

Follow these easy steps for your keywords targeting Amazon.
Finding your Targeted Keywords:
You will have few keywords already in your mind according to your product.
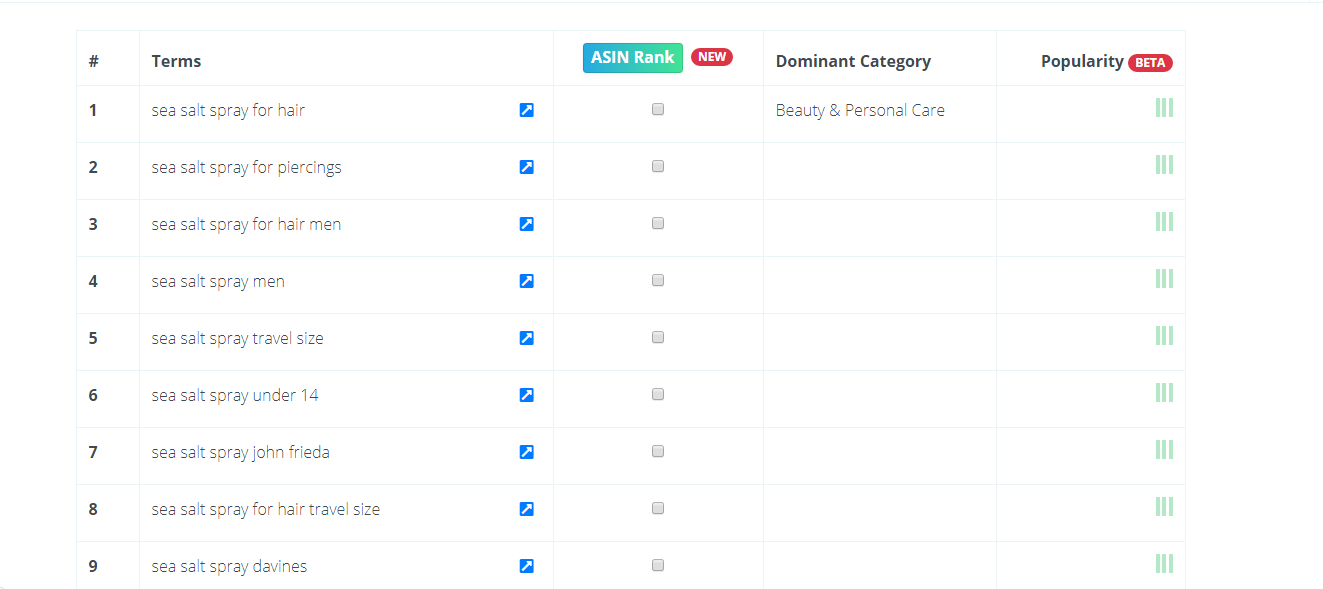
For example: if you are trying to sell “Sea Salt Spray in Amazon”, you have to find the searches that are done to find the products related to yours.
Looks difficult? Here it is…
Step #1
Type your product in the keyword bar and click on the search bar.
Step #2
Select your country. Wait, you need to select the country where your target market lies. It doesn’t matter where you are selling from!

Step #3
After clicking the search bar, you will see a list of relevant keywords based on customer searches and trends. Note: Allow the tool to load for few seconds before it shows you the popularity.
You can also track your keywords rankings and clicks through this tool. For more insight about Amz Word Spy, please click on this link: – https://wordspy.amzonestep.com/
Learning the Relevancy Ranking Factors Of Amazon
I expect that you have learned the basics of keyword research. In case, you like to see a detailed explanation of Keyword Hack, please visit our blog section.
When monitoring your keyword ranking, you need to take care of certain principles that carry significant weight in the A9 Amazon Ranking Algorithm.
All of the factors mentioned below are equally important as they reflect your product ranking in the Amazon search.
In Amazon, the title of the product carries significant weight in the A9 Algorithm because this is where the relevancy is measured.
The way of writing titles for Amazon is different than Google!
In Google:
You are supposed to write an engaging title that should convince the visitor in clicking your link.
In Amazon:
All you need to do is to place your keyword that shouldn’t cross the 80 Characters mark. The keyword here plays the most important role in determining your CTR which in turn reflects your ranking.
While in both cases, title plays a role in determining your CTR so it should be relevant.
Note: There isn’t any hard and fast rule about the 80 characters rule, but I have experienced better results in that limit. https://poppromos.com/ You can exceed the limit if you want.
Believe it or not; Bullet Points are also a great ranking signal in the Amazon Ranking Algorithm. The search engine of Amazon marks a listing rich if it is equipped with reasonable bullet points that should be describing the features of the product.
In fact, this is where the convincing part happens. The bullets are ideal to convince your viewer in buying your product.
Most people write theories and reviews in bullet points. Please don’t do that!
- Describe the background of the product with proper reasoning
For example; if you are selling sea salt spray to your customers on Amazon, you should be describing why it is needed?
In my case, I would say:
If you are looking to curl your hair in less time without hurting your hair strength, you should definitely try this product.
I am sure you can write better than this, but I am writing this just for an idea. You need to place a proper reason that why should a customer buy your product.
- Use Technical Terms related to the product
When using technical terms related to the specification of your product, do write a few more words to describe it. Otherwise, it will confuse your viewer and will convince him to look for other products.
Not having a reasonable bullet point will have an adverse impact on your ranking on Amazon. Therefore, write bullet points in easy English that should be thoughtful and convincing.
- Place your keywords in Bullets
This is the best place to list your keywords. Bullet Points are likely to be indexed by the Amazon Algorithm which will give you an additional benefit in your ranking if you have placed your keywords within that.
This is where the creative part is needed. Engaging content with fine use of words is most likely to convert your views into sales that will increase your rankings eventually.
As in your title and bullet points, you need to place your main and long-tail keywords in the description as well.
But, don’t repeat the same keywords as they make no difference in your Amazon Rankings.
It’s nearly impossible to get ranked if you haven’t listed the brand name in your title and description. Brand name increases the trust of the customer on a particular product as it plays a convincing role which helps him to make a decision.
You should even add a manufacturing number in your title if it has one. This way, you can also check the customer searches on that particular brand which will create a wider market for you.
Not all products would be needing detailed specifications. But, they are always a plus point for your listings.
Make a table for the specification but it should be simple. The message should not be detailed but should reflect clarity.
Stuff related to size, shipping weight, color, and techs can be added there.
It sounds simple, so it is. But, do add your product in the ‘most relevant category’. Because, when a customer clicks on a certain product, the same products in that category are shown. This way, you have a higher chance of getting visibility.
If you know a bit about Google SEO, you would know the importance of short links. You don’t have to write a story in your link. Cut it short!
If you are selling a juice washer, let the URL be [Juice + Washer], that’s it! In case, your keyword is a bit long, make it short using bit.ly.

Some Other Ranking Factors that affect your Product ranking
So you have listed your product carefully in Amazon by keeping the title, description, and other features relevant and according to the Amazon Algorithm.
You have also placed the keywords in your title, bullet points, and description.
Now, there are few more ranking factors that you can’t do much about them. To your surprise, they carry a significant weight too!
While not only negative feedback can extirpate your brand value, it can have adverse impacts on your Amazon rankings.
Negative feedback should be taken seriously, otherwise, Amazon will not take your product seriously at all. Just like you, Amazon also wants to maintain good customer experience.
The moment, you are hit with negative feedback, do something about it.
If the review targets a damaged side of your product, reach out to your customer and get it replaced in the first place. Don’t risk your brand value for over few dollars.
If your customer is concerned about the quality, get him replaced with a better one.
Thus, the seller feedback plays a defining role in your ranking so it should be maintained as high as possible.
First of all, it is bad for your customer retention. I know, you would be thinking of pre fulfillment cancellations but that doesn’t solve the issue, right?
The percentage of refunds and cancellation adversely affects your Amazon ranking. This happens mostly when your products are out of stock.
Therefore; it is vital to make sure that your products are always in stock as that will help you to increase customer retention and your Amazon Ranking.
- Perfect order Percentage (POP)
It is calculated as a measurement of orders delivered smoothly to the customer against the total number of orders.
POP (Perfect Order Percentage) heavily relies on the following factors:
- In-Stock Rate: If you have been consistent in keeping your stocks high, you are most likely to have a high POP get ranked in Amazon.
- Accurate Product Listing: With an Accurate product listing, you are most likely to have a higher POP.
- Quick Shipping: On-time shipping’s are considered ideal because it attracts the Amazon Algorithm in getting your ranked higher.
Higher the POP (Perfect Order Percentage), the higher the rankings.
Before understanding these metrics, you should have a clear idea about the ASIN.
The Amazon Standard Identification Numbers (ASIN) are a unique blocks of 10 letters that identify a particular item. ASIN is significant to both sellers and Amazon.
For Amazon, it is a way to create and manage their catalog. With the help of Product’s ASIN, Amazon delivers accurate and relevant product searches for the customer.
For Seller, it means a lot. ASIN number is used to track their products in Amazon and this is the only way Amazon recognized their products.
Unit Session Percentage is defined as the ratio of the number of units sold on a particular ASIN against the total number of sessions that ASIN had in that particular timeframe.
In short, products with high unit sessions are most likely to get ranked in Amazon and those products are better bets for Amazon to promote and earn more in many ways.
When you are in the FBA program, you can’t really make sure about the product being shipped to the customer because Amazon does the shipping part.
Each claim put by the customer is considered as an order defect. If the order defect increases by 1%, it’s time to be more vigilant.
Your first priority should be to deliver your product in the best quality.
If the number of orders is 100, and only 1 order defect is reported on your listing:
Order Defect Rate = (Order Defect/ Number of Orders) * 100
(1/100)*100 = 1% Order Defect Rate
Take care of your customer satisfaction, otherwise, you are out of business!

The need for Good Photography in Amazon Listing
So you have optimized your listing well according to the relevancy factors and have fed long-tail keywords in title, bullet points, and in your description.
The next thing is “Photography”
There had been countless debates among SEO experts and Amazon Sellers regarding the need for Photography in Amazon Listing.
Too many SEOs, ‘Amazon Algorithm only works on the conversion rate (CR) and the cost per click (CTR). It means that if you have a good CTR and CR, you are most likely to get ranked in the Amazon Search.
Is it wrong? No, it isn’t. But, does it remove away the need for photography? Off course, not!
It is a matter of fact that Amazon does consider Conversion rate, CTR, and other factors when determining the ranking of products.
Let me ask you this; on what factors does CTR and CR depends?
From quality content to proper listings to photography; these factors determine the CTR of a product because they help the customer in decision making.
The image is the first thing the customer sees in your listing. It plays a convincing role for a customer in making a purchase.
Bad images don’t work at all. If you have been ignoring the need for Good Photography up till now, you should come out of your fool paradise.
Go and search the top Amazon Sellers who are ranked at the top in Amazon; you will find that most of them have great photography in their listing.
It’s 2019, you don’t need lectures that should convince you of the need for Photography in e-commerce.
Back to the point!
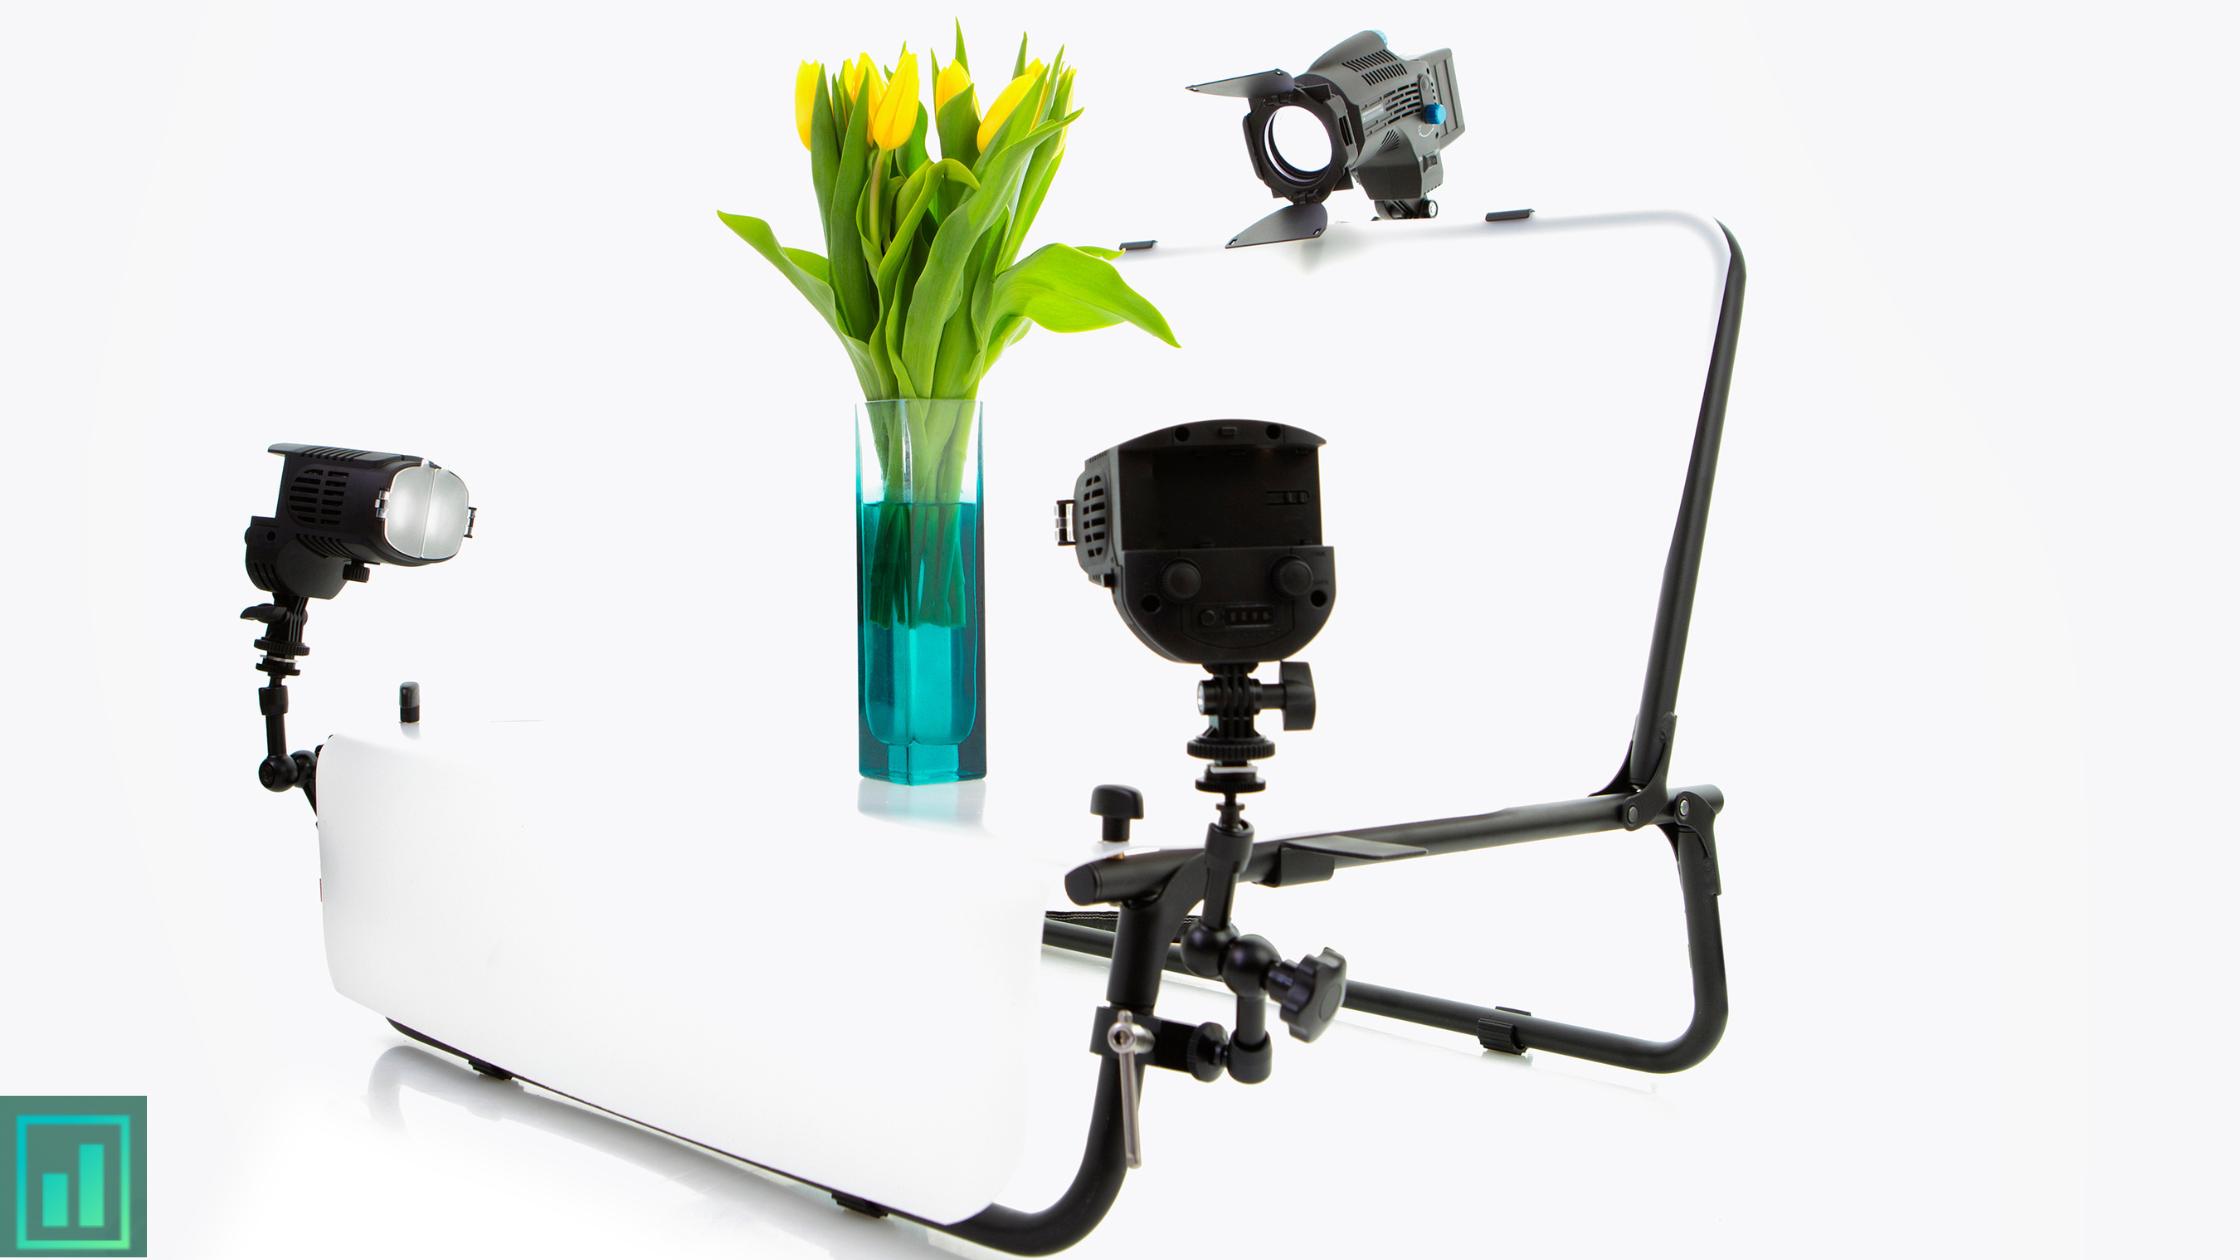
You need a studio for Amazon Photography. If you don’t have it, read the guidelines about making your own studio at home.
Please note down the must-have features for Amazon Photography.
- Keep the Background White
Remember, it isn’t a wedding shootout. Images on white backgrounds are considered ideal for e-commerce as well as for Amazon Listings.
Amazon allows up to 9 images per listing. The main image has to be on white background as ruled by the Amazon.
White Background is known to be the most professional among many photographers and designers mainly because it makes the product center of attraction while it reduces distraction from the main product.
Moreover, as recommended by Amazon, your product should occupy at least 85% of the space in the image.
This is the basic rule of thumb for any good Photographer. Capturing in the bright has its own charm and elegance.
You can do that easily in your studio by placing special effects that are made to deliver bright light. In case you don’t own a studio, the side of the window will help you in getting the perfect shot.
- Use High-Resolution Images
The customers always tend to see every bit of the product before making a purchase. High-resolution images will allow your customer to look closely at your product that will eventually increase your CTR and CR respectively.
The ideal pixel of the image is not defined. But, most successful Amazon Sellers keep the pixel to be 1500.

Here are a few tips and tricks for your Perfect Amazon Photography.
Tip #1
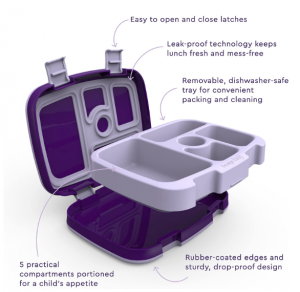
Try to Place the Target Market in the picture
Your graphic designer can play a defining role in creating a balanced picture that could speak for itself. An image that consists of a target market within itself is more likely to sell. This is proven from the great experiences of Amazon Seller who were successful in generating sales on images that has target market included in them.
If you are selling a baby towels or something related to baby stuff, you should add the mother and the smiling baby in the image. I am just giving an idea; off course, you can come up with something better.

I agree that these shoots require more time than the normal ones. But honestly, it will do wonders for you.
Tip #2
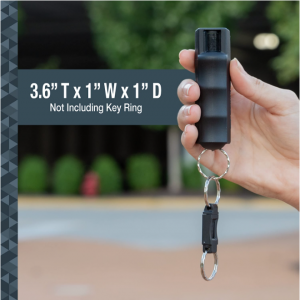
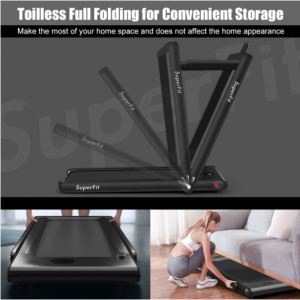
Create the need for the product
This is a renowned rule of marketing that is taught worldwide; create the need for the product.
In Amazon, you have an ideal opportunity to do it through your Images. And yes, Images certainly can develop and illustrate the need for the product at great intensity.
Here is a perfect example where the need itself is created by the designer!

The need is perfectly illustrated in the image. The shopping bags made up of cloth are a great alternative to plastics which is great for a healthy environment.
Tip #3
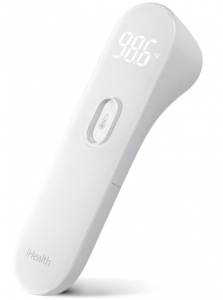
Adding emotions to the image
Sometimes, adding emotion to the image works great. The reason I used ‘Sometimes’ is because it doesn’t work all the time (in my personal experience at least).
Smiling faces, people worried due to something, struggling man/women racing towards their goal; these are certain emotions that worked well for Amazon.
An example of emotion is perfectly described in the image below:

For more photography tricks and tips, get our Free EBook on Amazon Selling.
PPC can be a Game-Changer for Your Amazon Business
Before we go into PPC, let’s assume:
- You have started your Amazon business and have studied thoroughly the A9 Amazon Ranking Algorithm
- You have done extensive Keyword research and have planned powerful keywords for your listings.
- You have developed the content for your listing and have sniffed the keywords in description, title, and in your bullet points
- You succeed in getting good photography done and have uploaded your images on Amazon.
The basics are complete and hopefully, they will generate good results.
But, have you ever thought of boosting your sales in one go and getting the ultimate exposure in less time?
Yes, I am talking about the PPC for Amazon.
In case you are new to PPC, here is a simple explanation for it.
“Known as the pay per click, it is a form of advertisement that is done primarily to get clicks and sales. The advertiser has to pay every time a customer clicks on their ad.”
The same goes for Amazon PPC. So what can Amazon PPC do for you? Is it worthy enough to invest?
Advertisements are the need for every business. In Amazon, it is more than important. Before we go into the details, it should be noted that Amazon PPC is the best way to increase the CTR, which ultimately increases the ranking of your keywords.
These 5 hits will convince you to run the PPC ads for your listings.
- Beating the competitors in the tough market.
It happens mostly in best-selling niches where you can be outrun by your competitors through PPC even though you have a good organic position. So staying in the market and getting the right share demands the need of Amazon PPC.
- Getting Maximum Sales on the seasonal trends
Amazon market is hot mainly on seasonal trends like Christmas, Mother’s Day, Black Friday, and Halloween. This is the time where you should be investing in your advertisements to achieve the maximum share of sales and revenue.
- Earning exposure for new product launches
Getting fast exposure to the newly launched products should be your #1 priority. You can’t rely on your organic exposure all the time because the competition in that area can be really tough to meet. On those grounds, Amazon PPC is by far the most effective method to get decent exposure for your products.
- Buying the organic Rankings
In areas, where acquiring the high rankings are difficult due to tough competition, Amazon PPC can help you earn those organic ranking. This will double your sales and revenue in very less time.
A little investment can earn you quite a lot in less time.
According to an authentic source, 45% of clicks are made on top 4 ads. You surely don’t want to miss that!
To make things easier for sellers, there are countless PPC Analyzer tools online that makes PPC management very easy and convenient.
Every Amazon Seller looks for exposure for their brand. PPC is just a way to buy that ‘exposure’.
Like Facebook Ads and Google Ads, Amazon PPC is a great way to boost up sales and revenue while achieving the ultimate exposure.
There are 3 advertisement formats for Amazon PPC.
This form of PPC is known as ‘Keyword Targeted ads’ that enable advertisers to promote a particular product against a chosen search query.
For example, I am looking to sell Portable Mouse in the USA.
Step #1:- I will look for a powerful keyword that has been searched mostly by the users. Let’s suppose, I chose ‘Portable Mouse for Laptop’
Step #2:- Now, I will run a PPC ad for Portable Mouse with the target keyword.
Every time, a user search the term ‘Portable Mouse for Laptop’, my product will show on the top and will eventually get the first click. On every click, you have to pay Amazon a certain amount which is called the ‘Advertising Fee’.
The only difference is; instead of a certain product, the brand is being sponsored.
They are very similar to Google ads. For these kinds of ads, you are required to create an audience with certain interests and target them to your product.
You probably might be thinking that how much a click will cost me?
It depends upon the bidding. Each advertiser ads a bid before running a PPC campaign. The one with the highest bid receives the top position and vice versa.
The average CPC for most Amazon Ads revolves around $0.02 to $3.
Once you have automated your PPC campaign against a targeted keyword, the next step is analyzing that campaign.
The only definition of a successful campaign is something that earns you 7x to 10x times more than your initial investment. A campaign that isn’t driving the results is simply a failed campaign.
To Summarize
Here are the key points of the entire blog post.
- The A9 Amazon Ranking Algorithm uses conversion rate, relevance, and customer satisfaction in determining the ranking of a product. Therefore, they should be carefully abided when creating a listing for Amazon.
- Keyword research is more than important for improving your organic rankings. Use long-tail keywords in your product title, description and bullet points. Avoid repetition of keywords because they make no difference.
- Photography is the backbone of Amazon Listing. It helps in improving the CTR and CR of a listing which in turn increases the keyword ranking.
- PPC is a great way to buy those rankings that are tough to achieve organically. Take full benefit of seasons by running efficient PPC campaigns by targeting customers on the basis of their interests.
If you haven’t been scrolling fast, I am very sure that you know how Amazon Ranking works! In case, you’re looking to outsource your Amazon Business, get in touch with us.
From listing optimization to Amazon Product Photography to PPC to Enhanced Brand Content; we have got you covered.